How do you start?
Congratulations on starting your crochet journey!
Crochet has become more popular in recent years. It is no longer a "granny hobby" - in fact, 71% of crocheters are within the age range of 18-54 years old (Dobush, 2017)! In my own lessons, I've seen more of an interest with kids wanting to learn amigurumi (Japanese for "knitted dolls") and make adorable animal plushies like jellyfish, bunnies, and cats. I'll share my strategy for getting started!
1. Get a hook! First you want to consider hook style. The two most common hook styles are inline and tapered. Inline hooks are more angular and pointy, making them ideal for crocheters who have tight tension or who like to do projects requiring small, even stitches. Tapered hooks (here's what I prefer) are more rounded and have a slightly wider tip than inline hooks; these are great for speed and reducing yarn splitting. Fiberflux.blogspot.com has a great visual: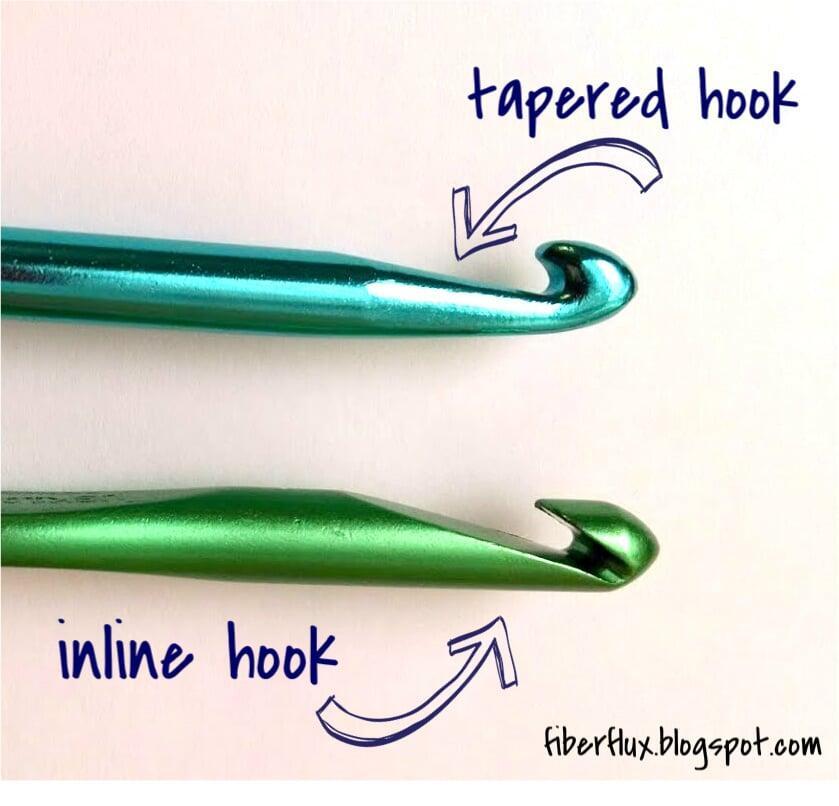
Next, you want to consider handle shape. The basic design is a shaft of the same material as the hook tip, such as aluminum, wood, or plastic. These are cheaper than the alterative option of an ergonomic hook. An ergonomic hook is designed to reduce muscle fatigue and have a more comfortable grip due to the thicker handle that is usually covered in rubber.
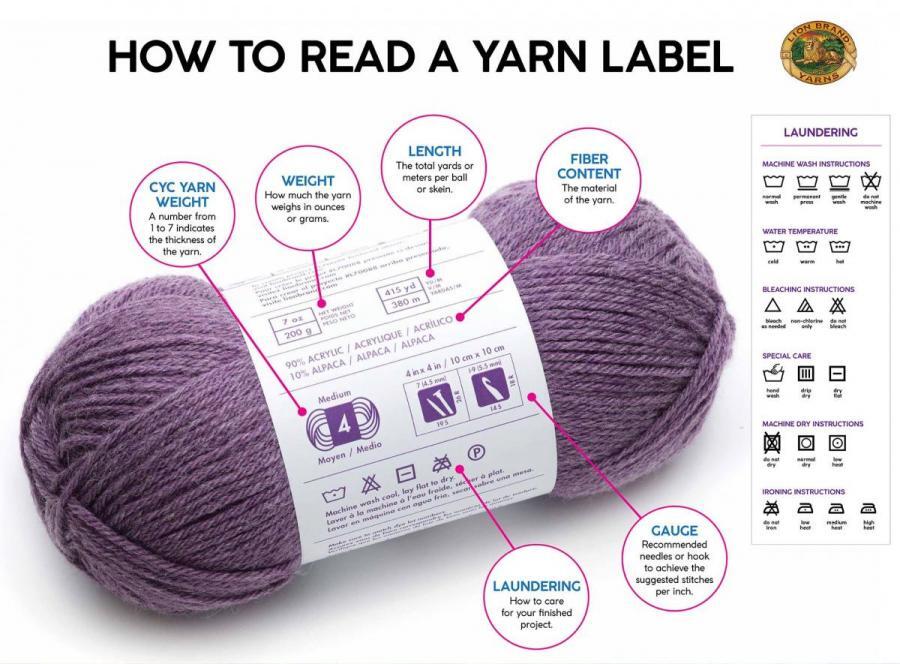
Lastly, you will need to determine what hook size you need. US sizes are written as letters, and everywhere else used the metric system. The pattern or the yarn label will tell you what hook size is recommended to use with it. The Craft Yarn Council has an excellent post explaining how to read a label. In the example pictured, an I or 5.5mm hook is recommended for this Worsted Medium Weight Acrylic/Alpaca blend yarn.
2. Get yarn! Although it is delightfully squishy, do NOT go for the plush yarn (yet) because the fluff will make it difficult to see the stitches. I recommend a tubular yarn like Loops & Threads' Cuddle Craft Tube yarn because it does not have obvious individual threads that could cause splitting. Additionally, it makes for very defined stitches due to the sturdy center cord, so you'll be able to see where to insert your hook. It is much more cost-effective than Woobles' Easy Peasy yarn, which has been praised as a beginner-friendly yarn.
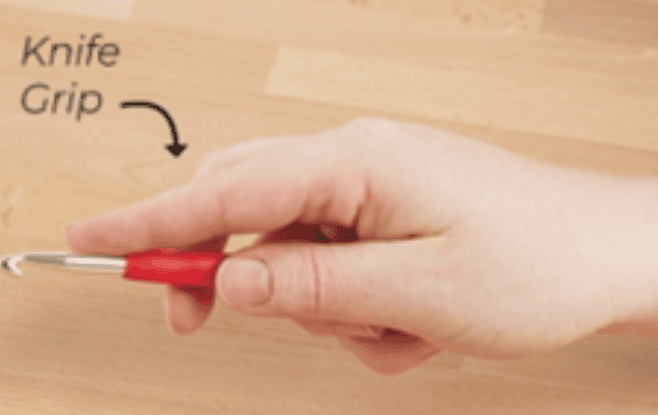
3. Practice your dexterity! Your dominant hand will be holding the hook, and your non-dominant hand will be holding the yarn. You can hold the hook in a Pencil grip, or a Knife grip - flip between the two to determine what is comfortable to you (Lipsey, 2025).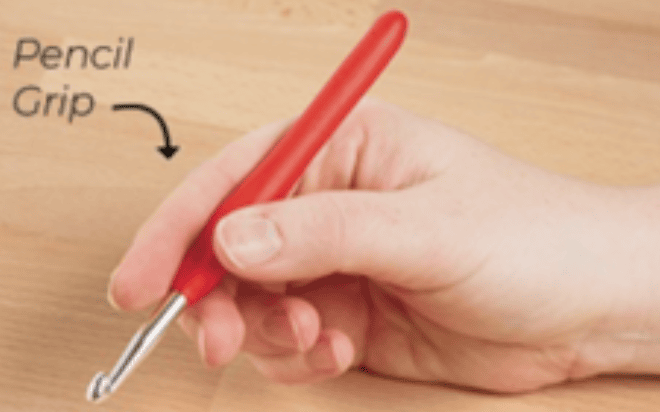
There's SO many ways to hold the yarn! Here is a video tutorial for lefties, and a video tutorial for righties.
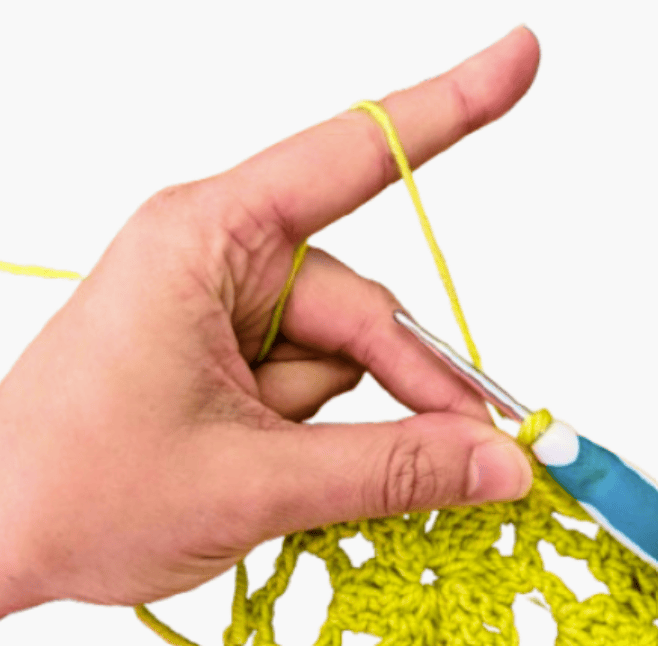
Below is the description for how I hold it, which I call minimalist style:
- Lay yarn flat on the table.
- High five the yarn with your nondominant hand about 3" from the hook.
- Split the yarn between your middle and index finger, such that the yarn is on top of your index finger.
- Raise your hand and make a finger gun. You want your pinky and ring finger to be clutching the yarn that's going towards the ball.
- Release your middle finger. Make your middle finger and thumb pinch the knot or stitch right below the hook. Your hand kind of looks like a "K" in American Sign Language that's been slid down the length of your middle finger. Another way to look at it is right half of a hand-drama-lama.
- Your index finger is what is controlling your tension, or how taut the yarn is. By flicking your index finger, you increase your tension by relaxing your index finger, your loosen your tension.
- A simple modification of this is to wrap the yarn around your index finger - this increases the tension because there is now more friction between the yarn and your fingers.
4.Practice your tension! Make a slip knot, and then chain, chain, chain! Here's a link to the stitch guide on my website. Your goal is to consistently make even stitches that are not too tight or too loose - Goldilocks your stitches to be juuuust right!